Search in this section
Table of Contents
Introduction
What is DMARC?
Domain-based Message Authentication, Reporting and Conformance (DMARC) is an email authentication, policy and reporting protocol. It enables email domain owners to protect their domain from unauthorized use (like spoofing and phishing attacks).
Note
- A DMARC record is absolutely essential for acquiring a Verified Mark Certificate (VMC) and must be set BEFORE ordering.
- The SPF and DKIM record MUST be set up before the DMARC record.
Important: In order to qualify for a VMC, you must have a DMARC record with “p=quarantine” or “p=reject”.
What is a DMARC record?
A DMARC record is a TXT record stored in the DNS, allowing email recipients to check the authenticity of received mail. It fits into the existing inbound authentication process and helps email recipients determine whether a message “aligns” with the information the recipient knows about the email sender.
Organizations have three policy options to handle “non-aligned” messages:
- “p = none” (no enforcement)
- “p = quarantine”
- “p = reject”
For DMARC to work properly, the Sender Policy Framework (SPF) and DomainKeys Identified Mail (DKIM) protocols must be set up beforehand. A DMARC record can be checked by using existing internet based tools, such as: https://domain-checker.valimail.com/dmarc
Why DMARC?
DMARC implementation offers four key benefits:
- Security
Protection against spam, fraud and phishing by preventing the unauthorized use of the email domain. - Visibility
Detailed reports about who/what is sending emails using your domain. - Deliverability
Increased deliverability (5-10%) and emails no longer flagged as SPAM. - Brand protection
Defend your brand against identity-targeted attacks.
- Security
Step-by-step guide
Setting up the SPF record
- Make a list of all your domains from which emails are sent.
- Make a list of all your IPs from which emails are sent, including:
- web servers
- in-office mail server
- ISPs mail server
- any third-party mail servers
- Create the SPF entry in a text editor and save it at the end. We recommend using an SPF generator.
- Example 1: v=spf1 ip4:1.2.3.4 ip4:2.3.4.5 ip4:x.x.x.x -all
- Example 2: v=spf1 ip4:1.2.3.4 ip4:2.3.4.5 include:thirdparty.com -all
- Now create the DNS entry. This entry must be created for each domain from which emails are sent.
- Name of the sub = leave empty
- RR type = TXT
- Value = the SPF entry with the server IP (use an SPF generator if necessary)
- Use an SPF tool in order to ensure that all entries have been set up correctly.
Setting up the DKIM record
DKIM (DomainKeys Identified Mail) is an email authentication standard that uses public/private key cryptography to sign email messages. This prevents messages from being
manipulated in transit. The DomainKey is generated on the server and subsequently stored in the zone.
- Set up the DomainKey on the server.
- Example: “standard._domain.example.com” = host name
- Generate a public-private key pair for your domain(s).
- Windows end users can use, for example, PUTTYGen
- Linux and Mac end users can use, for example, ssh-keygen
- Create a new TXT record in the DNS for the corresponding domain(s).
- Name of the sub = default._domainkey
- RR type = TXT
- Value = the DomainKey of the server starting with v=DKIM1; (can be activated directly in Plesk frontend if applicable)
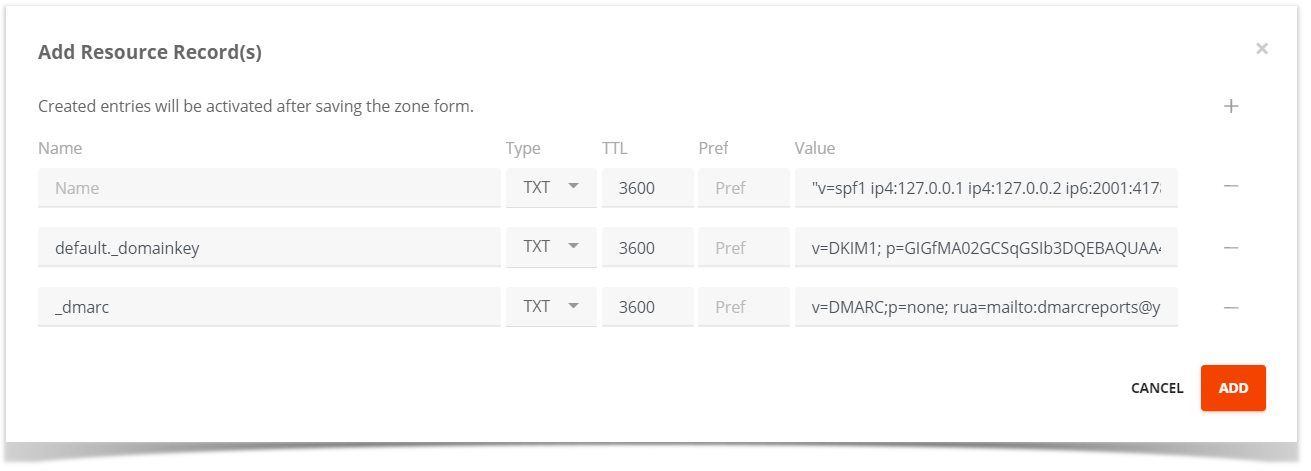
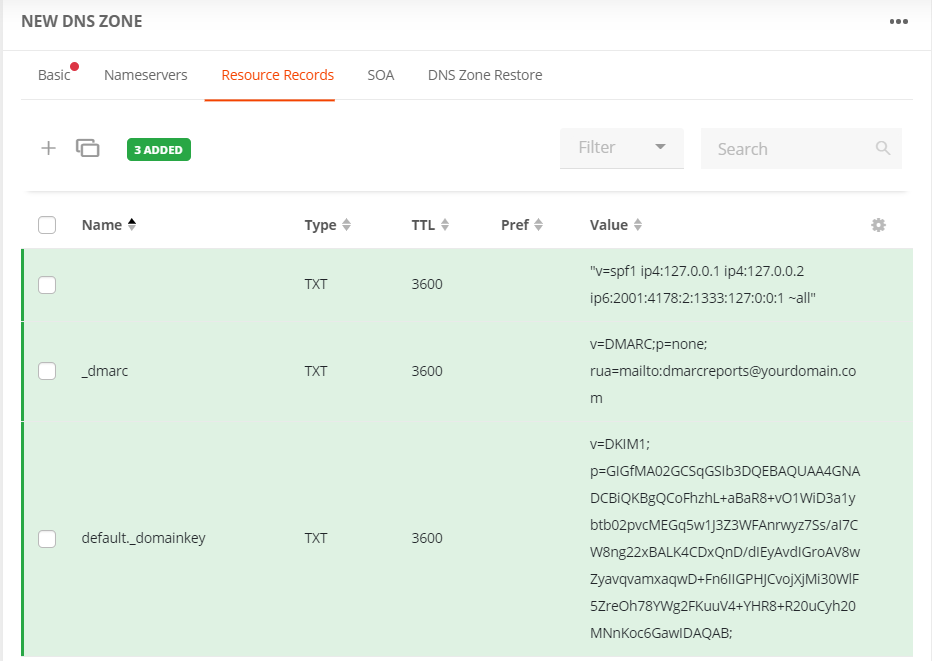
Add resource record(s)
Information for customers using a Plesk server:
If you are using Plesk, the local DNS server must be activated. Subsequently, upon activating the DKIM in the mail settings, Plesk creates the zone entries in the local name server. By opening the zones in Plesk, you can see which values/keys have been generated there. The key for DKIM can then simply be copied into the corresponding zone.
Please note: Without Plesk and a local name server, the setup/the create must be done manually as described above.
Setup DMARC monitoring mode
Set up DMARC to begin monitoring your current email traffic. This will give you a solid baseline for what is approved (and also for what will eventually be quarantined or rejected by DMARC).
Tip
Taking the necessary time to monitor now will prevent important messages from getting lost or permanently deleted once DMARC is fully enabled.
Note
To qualify for a VMC, you must have a DMARC record with “p=quarantine” or “p=reject.”
Monitoring your traffic with DMARC
- Make sure that the SPF and DKIM records are set up correctly.
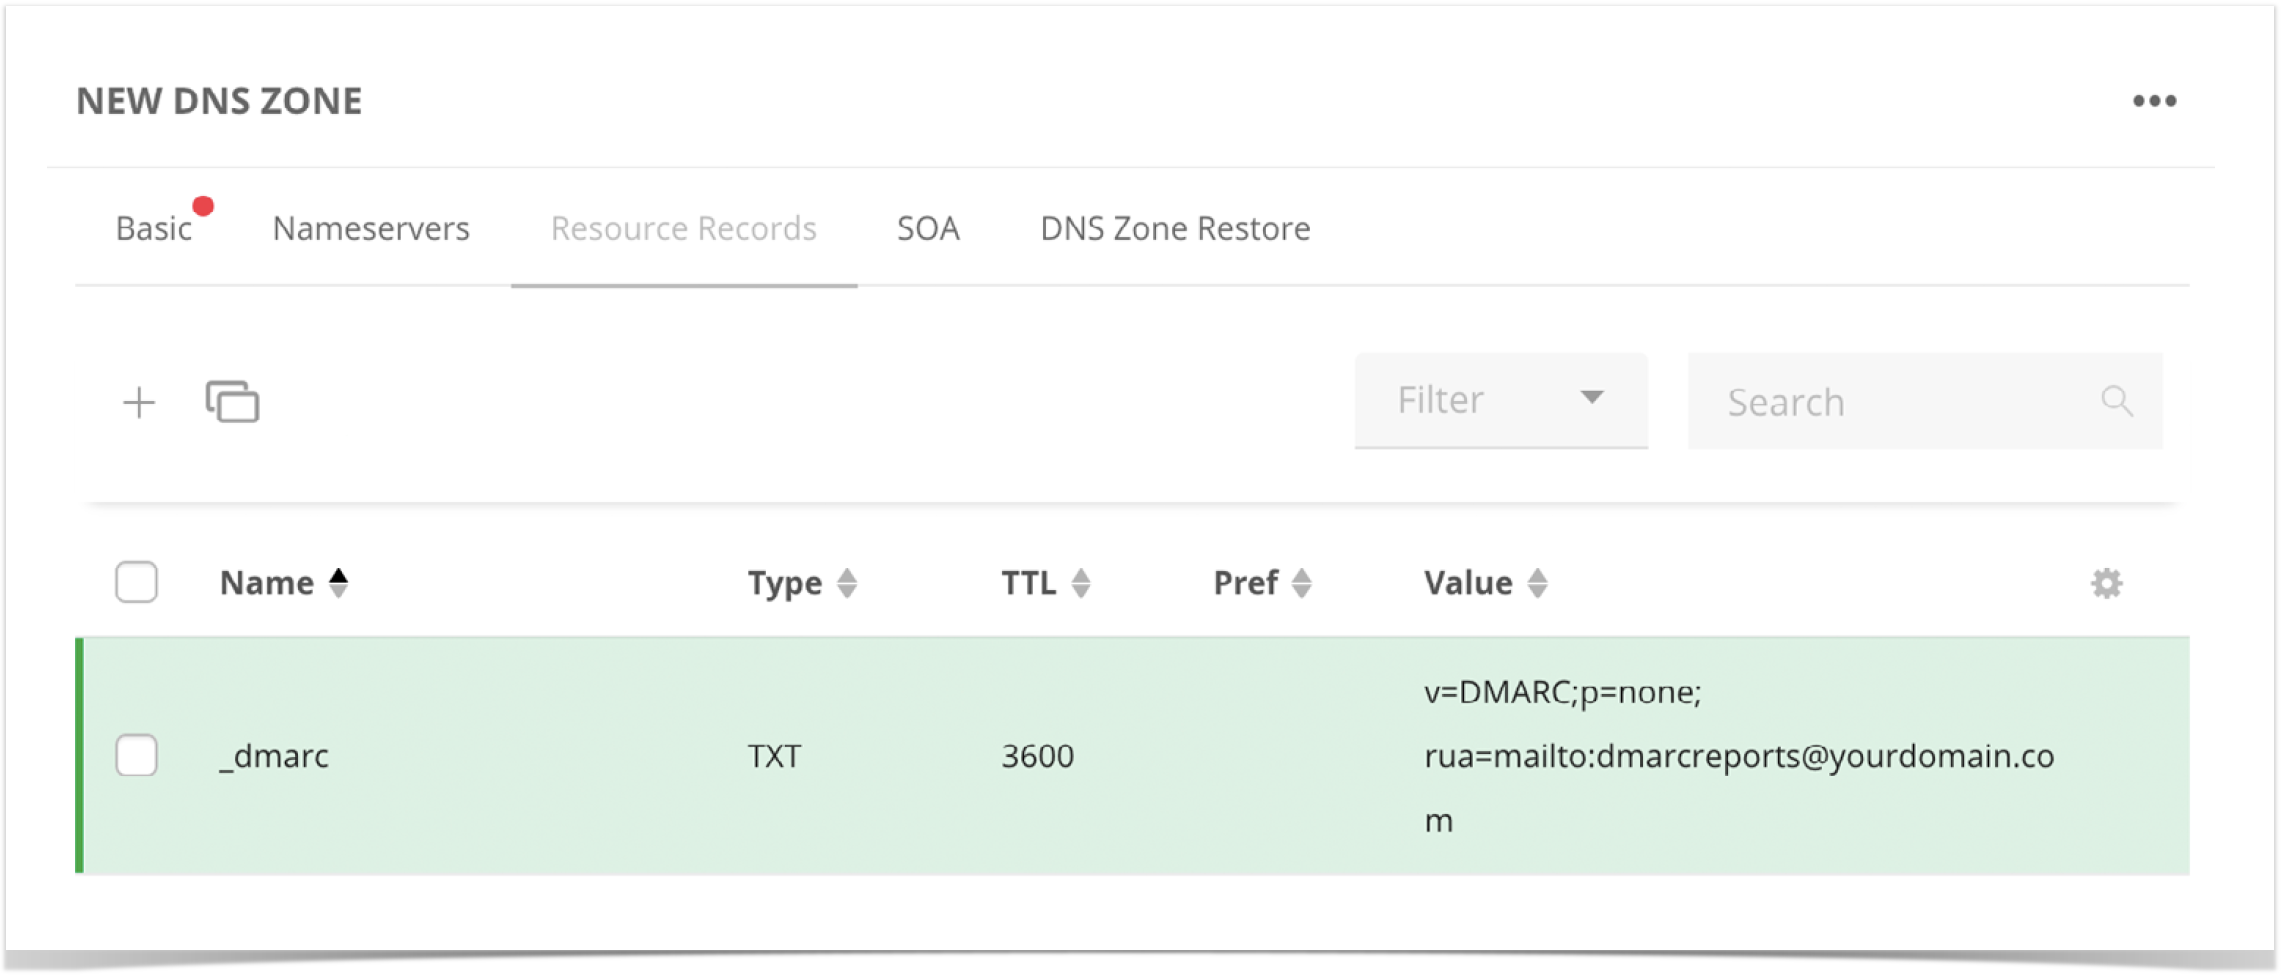
- Create the DMARC record.
- Name of sub = _dmarc
- RR type = TXT
- Value = v=DMARC;p=none; rua=mailto:dmarcreports@yourdomain.com
- Test your DMARC record by using a DMARC check tool.
Note
You usually have to wait 24-48 hours for replication. DMARC will now begin generating reports that will give you insight into the emails that are sent over your domain(s). This includes any messages that are flagged by SPF and DKIM.
Important: This is where you’ll find out if any legitimate senders appear in the report who weren’t previously included in your SPF record. If there are, make sure to update your record accordingly.
TIP
These reports are delivered in XML files, which are difficult to read. For this reason, we highly recommend using a DMARC report processor in order to facilitate reading and understanding the information.
Changing DMARC from reporting to quarantine/reject
The DMARC entry should remain in reporting mode until all errors / issues have been resolved or clarified. This process can take a considerable amount of time. However, this time is well worth investing. Finally, you can set the record to the next level “quarantine”.
- Open the DMARC record and change the entry as follows:
- “p=none” to “p=quarantine”
- Example: “v=DMARC;p=quarantine;pct=10;rua=mailto:dmarcreports@yourdomain.com”
- Add the flag “pct” (% of messages subject to filtering). We suggest starting with 10%.
Incrementally increase the percentage of filtered messages to “pct=100” (100%) as you become more comfortable.
Note
You must be at “pct=100” to meet BIMI and VMC standards, but your policy can be either “quarantine” or “reject.”
Important: Once you’ve reached 100% filtering, you are ready to move to “p=reject,” the highest level of enforcement.
- Open the DMARC record and change the entry as follows:
- “p=quarantine” zu “p=reject”
- Example: "v=DMARC;p=reject;pct=100;rua=mailto:dmarcreports@deinedomain.com
- Save the record.
TIP
It is important that you continue to monitor during this stage – to ensure that legitimate emails are not being rejected and deleted.
Preparing your VMC logo for upload
First things first: To prepare for the purchase of a VMC, your logo must be in Scalable Vector Graphic (SVG) format. The SVG must adhere to the SVG Portable/Secure (SVG-P/S) profile and there is no export template for vector applications like Adobe Illustrator today. Use the following bestpractice to prepare your logo.
- Transform pixels to vector format (‘.ai’, ‘.eps’, ‘.pdf’, ‘.svg’).
Logos that are pixel-based will not work. Logos must be converted to vector format. Many brand logos use word marks and fonts that can be converted easily. Other logos with more complex artwork may have to be reworked in order to make the design vector compatible. Export as SVG Tiny 1.2.
Once the logo is in vector format, it must at first be exported as an SVG Tiny 1.2 profile. In Adobe Illustrator®, this can be done through “Save As”:Note
The maximum size of the VMC logo is 32 KB.
- Make sure your image is in vector format (‘.ai’, ‘.eps’, ‘.pdf’, ‘.svg’).
- Open your file in Adobe Illustrator.
- Save your file by using the option “Save As.”
- In the dialog box, name the file and choose “SVG (svg)” from the dropdown “Format.”
- Click on “Save” and wait for a new dialog box to open.
- In the “SVG Profiles” dropdown, select the option “Tiny 1.2” and then click “OK.”
Open your SVG file in a text editor or a code editor (e.g., Notepad or Notepad++).
Note
As SVG files are text files, the central requirement is that you can open, edit and re-save to a “txt” format with a “.svg” file extension.After you open the file, you will need to make a few changes.
- While on the SVG file source, make sure that the following settings are in the header:
xmlns=http://www.w3.org/2000/svg
version=”1.2
baseProfile=”tiny-ps“ - There may be other information in the top of your file like the sample below, but these MUST be present. For example, you may see a string like this:
<svg version="1.2" baseProfile="tiny-ps" id="Layer_1" xmlns="http://www.w3.org/2000/svg" xmlns:xlink="http://www.w3.org/1999/xlink" viewBox="0 0 1080 1080“
xml:space="preserve"> - If you exported the file from Illustrator, you will need to change the baseProfile to tiny-ps, and delete the x=, y= and overflow items.
- Resave your file as text format, with SVG extension.
- While on the SVG file source, make sure that the following settings are in the header:
Line endings must be LF.
The SVG specification requires that line endings in the SVG file be Line Feeds or LF characters. The Illustrator SVG export tool includes CR LF. And, in some text editors the default is to use Carriage Returns or CR characters or a combination of CR/LF. The specification requires the use of only LF characters.Tip
We recommend using a text editor such as Notepad++ to visualize and do this conversion by following these steps.
Go to menu View → Show Symbol → Show End of Line you can see the CR LF characters visually.
Next from the menu item Edit → EOL Conversion and select Unix (LF).Save your file in text format again with the file extension ".svg".
That’s it. The file is now in the required SVG format.
Tip
- Images are best with a square aspect ratio (1:1).
- The image should be centered so that it displays optimally in a square, a rounded square or a circle.
- Non-transparent backgrounds are best, as rendering of transparency can be unpredictable.
Note
The final display of the logo depends on the respective email clients used by the recipients. There may be differences between the display form in the client and the logo that was originally uploaded.
Overview
Content Tools