

- Home
- TLS/SSL & S/MIME
- Order multidomain certificates
Order multidomain certificates
Here is a step-by-step description of how to order a multi-domain TLS/SSL certificate, using the example of a GeoTrust TrueBusinessID certificate.
Step 1: Before ordering
- Create the CSR key on the server where the certificate will later be used.
- Create TLS/SSL contacts if the required contacts do not exist in the system.
- Administrative contact = applicant (identical to the details in the CSR key). The contact corresponds to the company that will use the certificate.
- Technical Contact = Reseller/Provider
- Check if a MX-Record is created so that the confirmation email of the CA can be sent. (Only required for authentication method EMAIL)
Note that for multidomain certificates, the domain owner must be the same for all domains.
Step 2: Order certificates with the SSL Manager
- Click Order Certificate in the menu group TLS/SSL Certificates.
- In the section Product Choice, select the desired certificate in the Product list.
- Select the desired validity period in the Certificate Lifetime list.
- Under Server Software, select the operating system of the web server for which the certificate is issued.
All Windows servers are automatically PKCS7 encoding format, all other PKCS12. - For the SHA Fingerprint Version, choose between:
- SHA-256 Cert + Root: The current default. Returns a certificate chain in the SHA2 algorithm.
- SHA-256 Cert + SHA-1 Root: Returns a SHA2 certificate with the older SHA1 root certificate of the CA.
Certificates are only issued in the SHA-256 algorithm. The selection here allows you to choose between SHA-1 and SHA-2 root certificate issuance. The current standard is the complete SHA-2 chain (SHA-256 Cert + Root). The root certificate in SHA-1 is only recommended for old devices before 01/08/2013.
- “Certificate Transparency” is enabled by default.
What is “Certificate Transparency”?
With the “Certificate Transparency” procedure, certificates issued by mistake or maliciously are to be better recognized for a domain. The digital certificates issued by a “Certificate Authority” for encrypted Internet connections are checked and logged per default in a revision-proof logbook.
CSR Key section
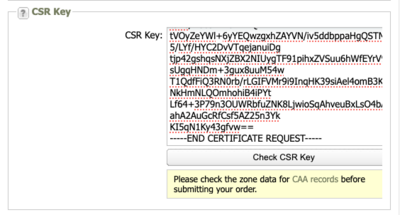
Insert the previously created CSR key here.
Note when copying the CSR key:
Mark the first line “-----BEGIN CERTIFICATE REQUEST-----” and the last line “-----END CERTIFICATE REQUEST-----” including the lines.
You can use a DigiCert tool to check the correctness of the CSR key beforehand: https://ssltools.digicert.com/checker/views/csrCheck.jsp
- Click the Check CSR Key button.
- The Common Name (certificate name) from the CSR key is displayed in the Name field in the Certificate Details section.
- For Additional Domains, enter the domains to be included in the multidomain certificate.
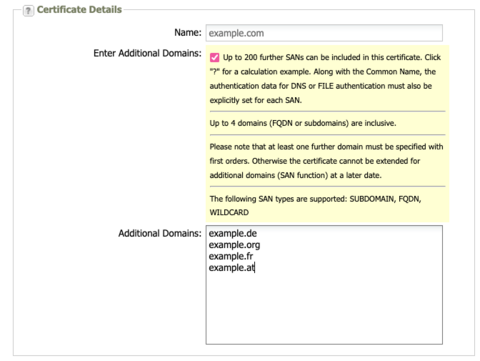
Please note:
When ordering a multidomain certificate for the first time, you MUST specify at least one additional domain. Otherwise, the certificate cannot be extended and will only be ordered as a single-domain certificate.
Contact section
- Select the required contacts here:
- Administrative Contact = Applicant (must be identical to the details in the CSR key)
- Technical Contact = Reseller/Provider
New contacts can also be created here by clicking the + icon. In some cases, however, the contact is already predefined and cannot be changed.

Authentication Settings section
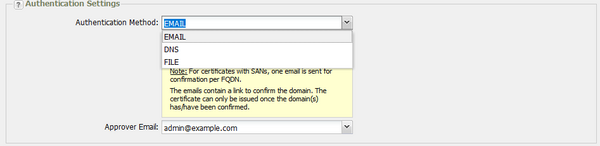
- Select the desired authentication method here.
Follow the instructions that appear in the yellow box after you select the authentication method.
Method: Email
- An email will be sent to the approver email address selected here.
- Select the email address in the Approver Email field.
- Click on the confirmation link in the email. This confirms the domain ownership. (MX-Record must be created for this).
Method: File
- Create a file with the data generated by the system.
- Store the file on the web server.
FILE Name: example.com/.well-known/pki-validation/fileauth.txt
File Content: 2018112007555401i23owspz4su5ry9q31j6rlhw89e4wwd2tz8jt9a0rpl36u1n
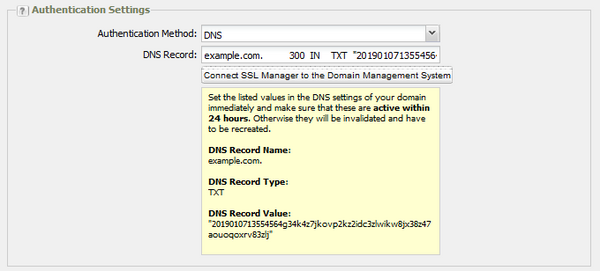
Method: DNS
- Enter the DNS record generated by the system in the zone. This method is used by default for the free Basic SSL certificate, for example.
Step 3: Tracking the orders
In the Order History you can track the orders.
Was this article helpful?
Thanks for the feedback.