

Getting started with AutoDNS
AutoDNS is the domain and certificate platform of InterNetX. A single interface is used to register and professionally manage domains, set up name servers and DNS zones, and order TLS/SSL certificates and other encryption products.
Getting started is the same for all accounts: create, activate and secure the account. In addition to the sign-up process, this article describes the most important actions in AutoDNS and links to further articles:
- Global search – the fastest way to domains, DNS zones, certificates and contacts
- Registering and transferring domains – for building the domain portfolio
- Maintaining owner and contact data – including the mandatory email verification
- Renewing, restoring and cancelling domains – around the end of the term
- Transferring a domain to another provider – with AuthInfo and pre-approval
- Creating and editing DNS zones – when a domain is to point to a website or a mail server
- Changing name servers – for transfers with existing DNS, custom name server host names or external DNS management
- Setting up redirects – for domain and email redirects without a dedicated server
- Ordering TLS/SSL certificates – to secure websites, emails or software
Getting started: creating and activating an account
AutoDNS is aimed at businesses and companies. Registration is free of charge; costs only arise with orders such as domain registrations or certificates. Getting started takes four steps, accompanied by onboarding emails: Sign up, Confirm email address, Activate account and wait for the account review.
1. Sign up
Open the registration form via Sign up and fill it in completely. Among other things, the number of domains managed is requested.
2. Confirm email address
- In the double opt-in (DOI) email, click Confirm email. Logging in is only possible after that.
- After logging in, a guest account is available. It can be used to get to know the interface and search for domains; paid actions are not yet possible.
When logging in for the first time, an optional onboarding opens with general settings such as name, currency and language, as well as a few questions about how AutoDNS will be used. It can be closed at any time, and the settings can be changed later. It is recommended to store an alternative email address and/or a mobile number there: these are required to reset the password.
3. Activate the account and enter payment details
- Start the activation via Activate account. The button is located in the main menu, in the shopping cart and in the email “Activate account”.
- Choose the payment model: prepayment or postpayment (see below).
- For postpayment, choose the payment method, then specify the billing currency (euro or US dollar) and the company details.
- Confirm that the account is used exclusively as a business customer, accept the terms of contract and complete the activation.
After activation, the email “Account activated” is sent with the customer number and the selected payment method. The customer number should be stated in all inquiries to ensure fast processing.
4. Account review
Before full use, every account is reviewed for security reasons. This usually takes up to 48 hours. After a successful review, the email “Account verified” is sent; from then on, all services and features of AutoDNS are available.
Payment model: prepayment or postpayment
The payment model also determines which services can be booked directly in the interface. Most optional services, with the exception of the Redirector, are not available for prepayment accounts.
| Prepayment | Postpayment | |
|---|---|---|
| Principle | Credit-based: orders are deducted from the topped-up credit | Billing via the selected payment method |
| Payment methods | Top up credit by credit card, bank transfer or voucher | SEPA direct debit, credit card or invoice |
| First order | After the account review and the first top-up; credit can only be topped up after the review | After the account review, as soon as a limit has been set for the account |
| Domain renewal | Manual (AutoDelete) | Automatic (AutoRenew) |
Topping up credit (prepayment): AutoDNS offers two options for this.
- Settings (user icon at the top right) → Top up account. The current credit is also displayed here.
- Settings → select the main account → Master data tab → Payment information → Top up account link with the tabs Credit card, Bank transfer and Redeem voucher.
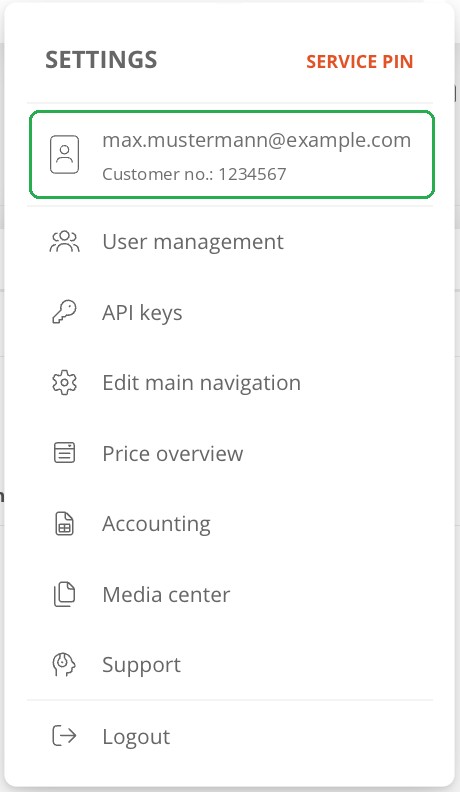
Limit for postpayment: Every postpayment account has a limit, similar to an overdraft limit. It is set after the review, reset once a month and applies to new registrations, transfers and package orders, not to renewals. As long as no limit is set, the shopping cart reports that the account balance is insufficient. During the review, master data and payment method cannot be changed.
SEPA direct debit: only for banks participating in the SEPA scheme and not in combination with billing in US dollars. To use direct debit, the bank details are stored in AutoDNS and confirmed with one click.
Payment method credit card: The payment method and credit card details are managed under Settings (user icon at the top right) → select the main account → Master data tab; a new credit card can also be added there later. In the Register credit card dialog, OK leads to the credit card form of the external payment provider. After a successful test booking, the credit card payment method is applied automatically. Fees may apply for credit card payments; AutoDNS displays them before payment.
Invoices can be viewed at any time under Settings → Accounting → Invoices tab.
If invoices are to be sent to a different email address or recipient, this can be adjusted in the master data: Settings → select the main account → Master data tab. The fields Different accounting email, Different addressee and Optional contact person are available there.
Prices and conditions
Current prices are listed under Settings → Price overview. Individual conditions are possible for portfolios of 250 domains or more; the number of domains is already specified during registration. For questions about prices and conditions, the Partner Success Team can be reached via the sales contact form.
Securing the account
- Two-factor authentication (2FA): Settings → User management → select user → Security tab. AutoDNS uses time-based one-time passwords (TOTP) via an authenticator app.
- IP restriction: With a fixed IP address range, restrict access to this range in the same Security tab.
Note: The IP restriction also applies to API access. API calls from IP addresses that have not been approved are then also blocked. - Additional users: Settings → User management → “+”. Separate users are recommended for web and API access; AutoDNS Standard allows up to 5 users per account.
If the password is no longer known, see Password expiry and password reset. Further questions about account and payment are answered in the FAQ AutoDNS Domain Platform.
Global search
The global search in the main menu is the fastest starting point for many actions. After entering a domain name, it shows:
- the status of the domain with a direct action: Order for available domains, Transfer for domains already registered, each with the price
- suggestions for alternative extensions and the estimated value of the domain
- a link to the Domain Studio with further suggestions and filters
- matching results in DNS zones, certificates, redirects and contacts
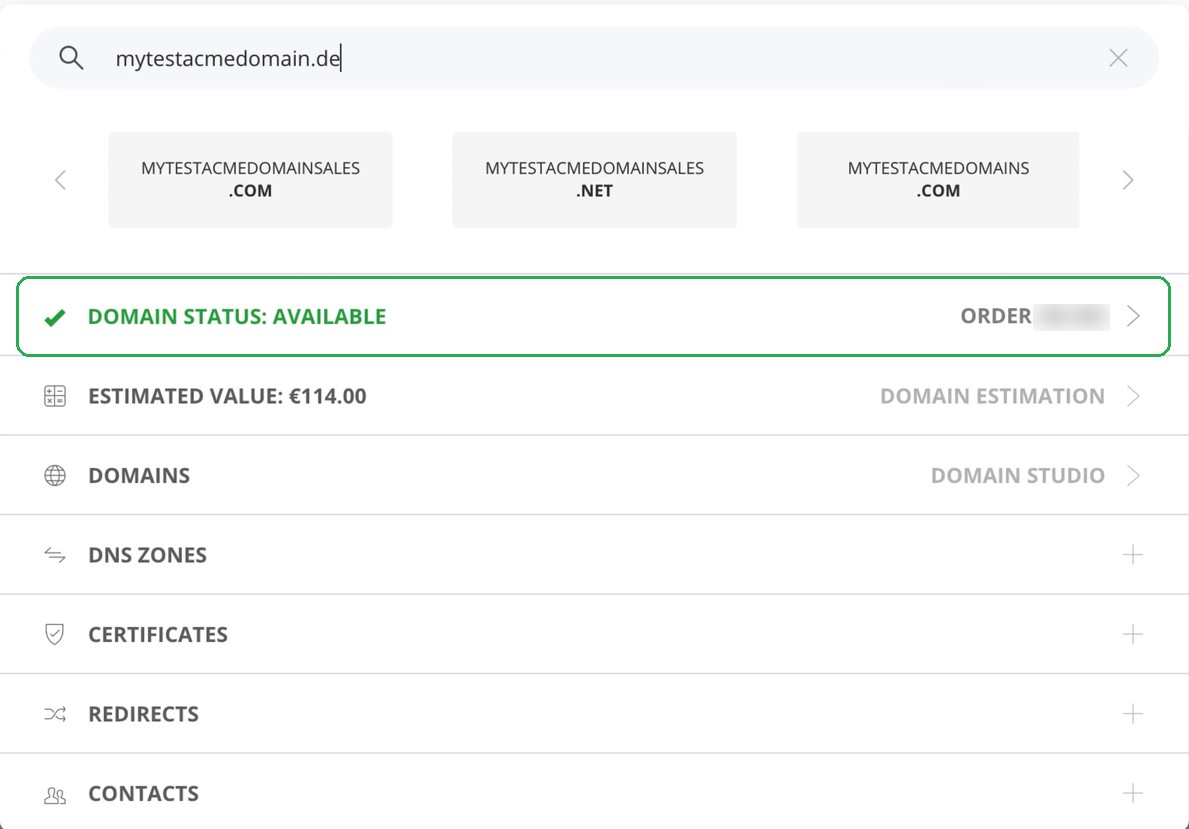
Registrations and transfers from the search are first added to the shopping cart. They only become chargeable with Place order; before that, contacts, term and price can be checked in the shopping cart.
Registering and transferring domains
Domains are searched via the Domain Studio or the global search directly in the main menu and ordered via the shopping cart – individually or in bulk. Before the first order, it is worth checking the TLD Knowledge Base: it lists the registration rules, deadlines and specifics of every extension.
Enter the domain owner correctly: The domain belongs to the owner (OwnerC) stored in the Whois. Companies should therefore enter correct, company-related data as the owner. Whois Privacy is available to protect personal data.
Registering a domain
Fastest way: Enter the domain name in the global search in the main menu. If the domain is available, a click on Order adds it directly to the shopping cart. The search field of the quickstart widget on the dashboard works the same way; the widget can be added via Customize dashboard.
The Domain Studio offers more choice, suggestions and filters:
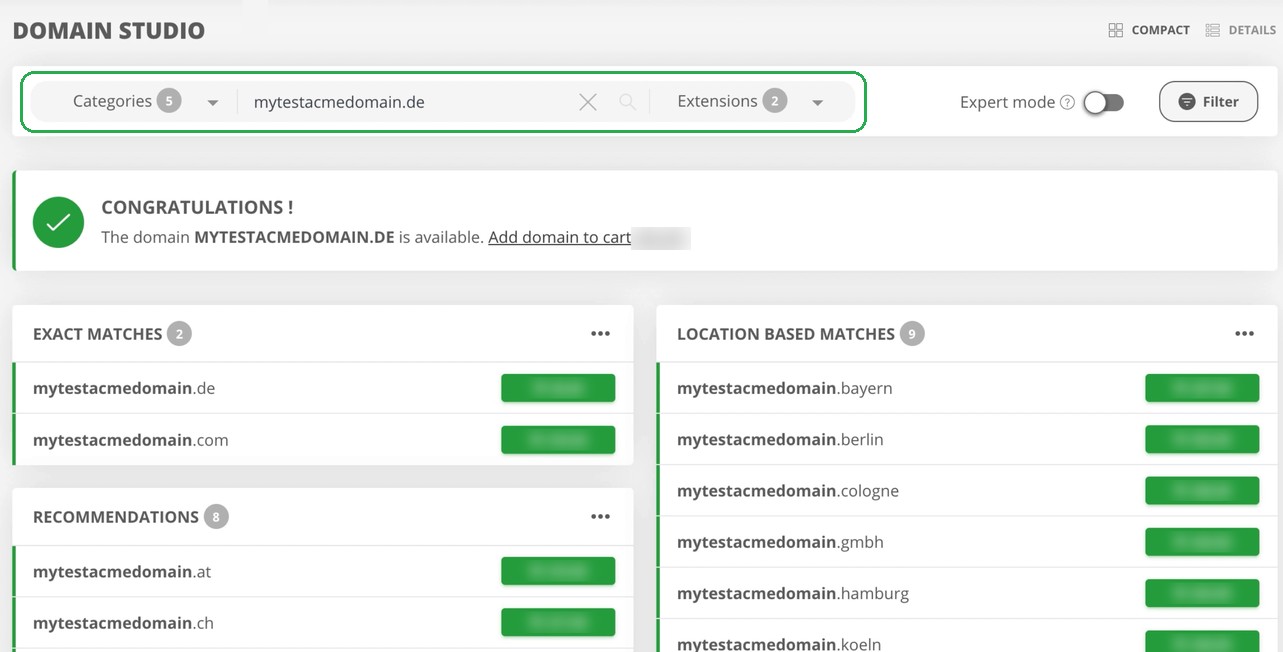
- Open the Domain Studio via the Domain Studio link in the global search or via the DOMAINS menu.
- Enter the desired domain name in the search field of the Domain Studio. The Categories drop-down adjusts the result categories, and the Extensions drop-down selects specific TLDs or TLD groups for the search.
- The Domain Studio shows the status and, if applicable, the price, plus further matching suggestions.
- Add the desired domain to the shopping cart using the green button with the price.
- Click the shopping cart icon and then Checkout in the pop-up menu.
- On the shopping cart page, enter the domain contacts (OwnerC, AdminC, TechC, ZoneC) and the name servers, and activate optional services such as Whois Privacy if required.
- Complete the order with Place order.
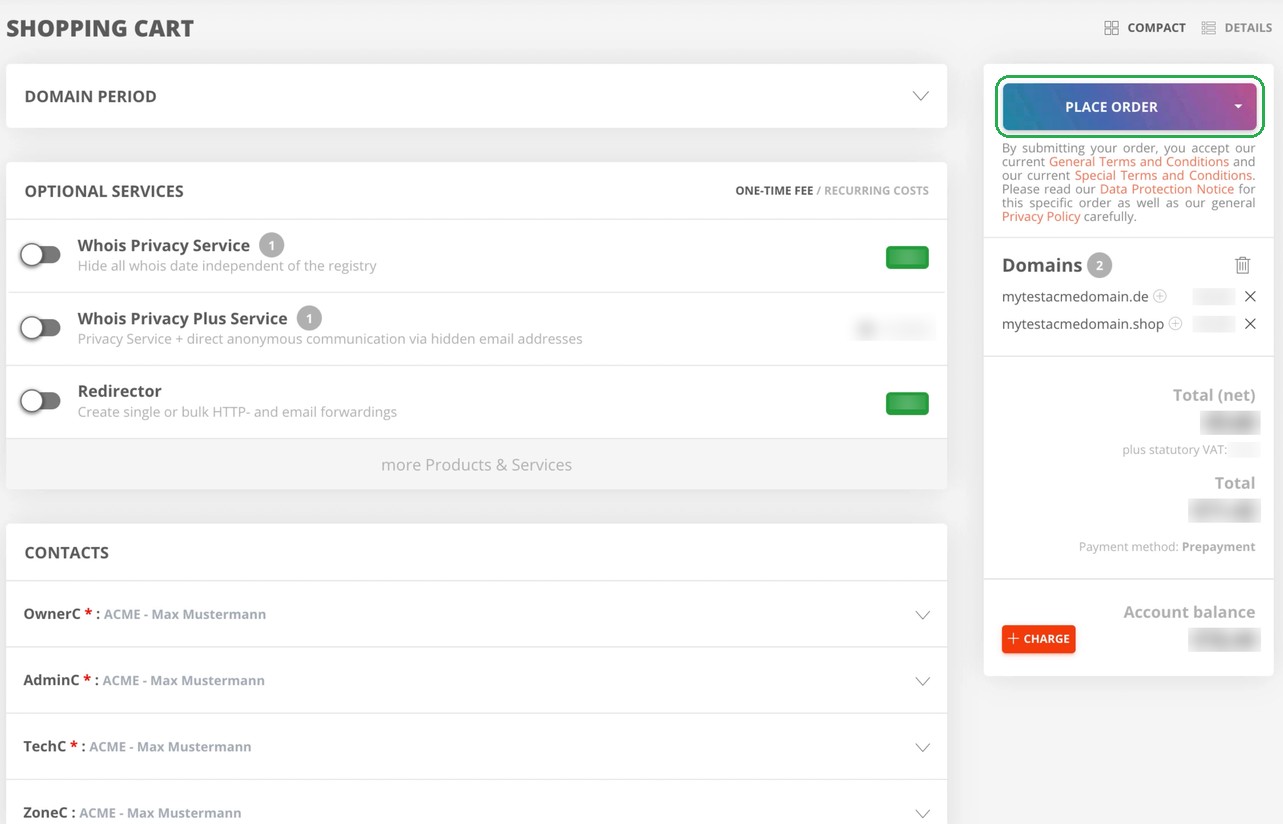
For new registrations and transfers, a DNS zone can optionally be created automatically for the domain (see section DNS zones).
Registering multiple domains (bulk)
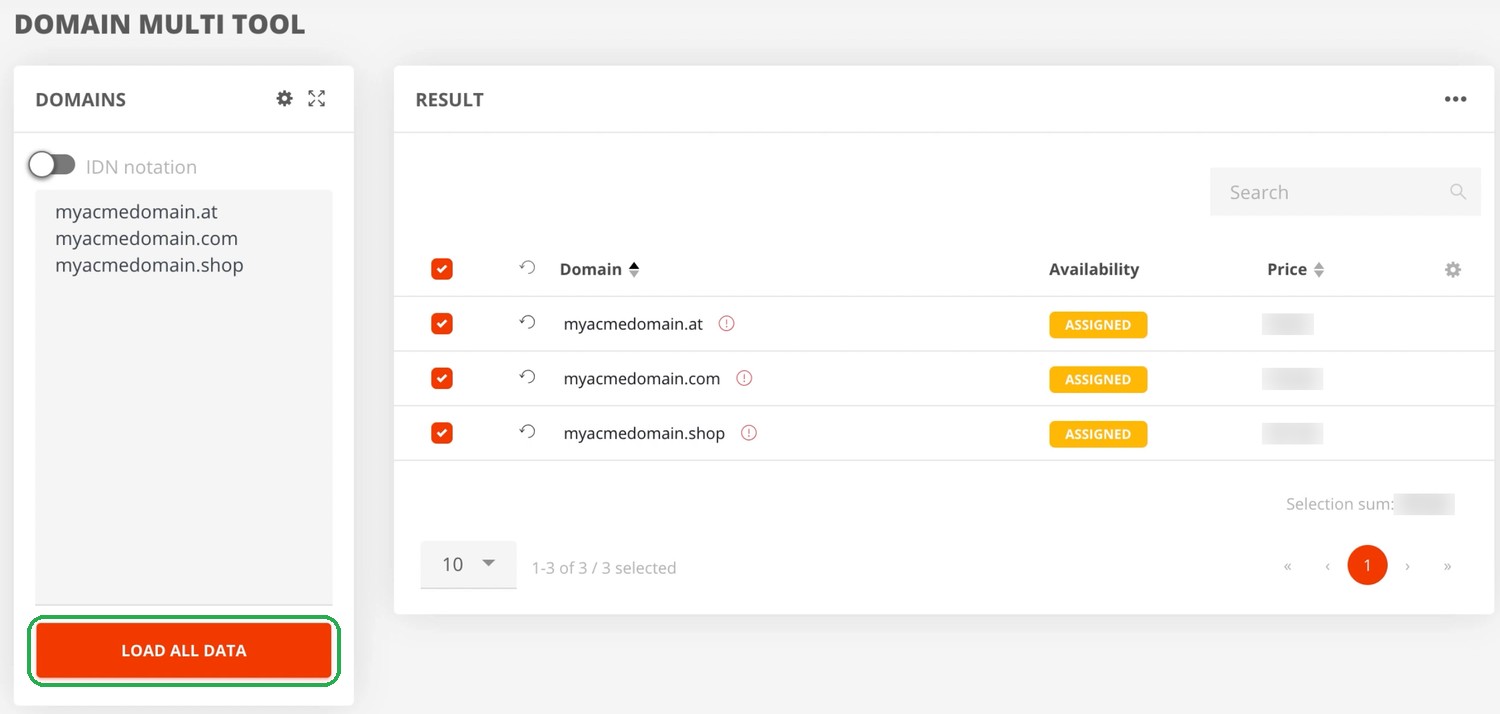
- Open the Domain Multi Tool in the DOMAINS menu, enter the domains line by line in the DOMAINS field or drop a text or CSV file via drag & drop, and click Load all data.
- Select domains with the status “available” and add the selection to the shopping cart via the shopping cart button.
- Enter domain contacts and name servers in the shopping cart and complete the order with Place order.
Transferring a domain
Before the transfer, request the domain’s AuthInfo (transfer code) from the previous provider. For many extensions, a transfer is blocked shortly after a registration or a change of owner; the deadlines per TLD are listed in the TLD Knowledge Base.
- Enter the domain in the global search. For a domain that is already registered, the search shows the status Assigned and the option Transfer with the price. Clicking it adds the domain to the shopping cart with the transfer option.
- Click Checkout via the shopping cart icon.
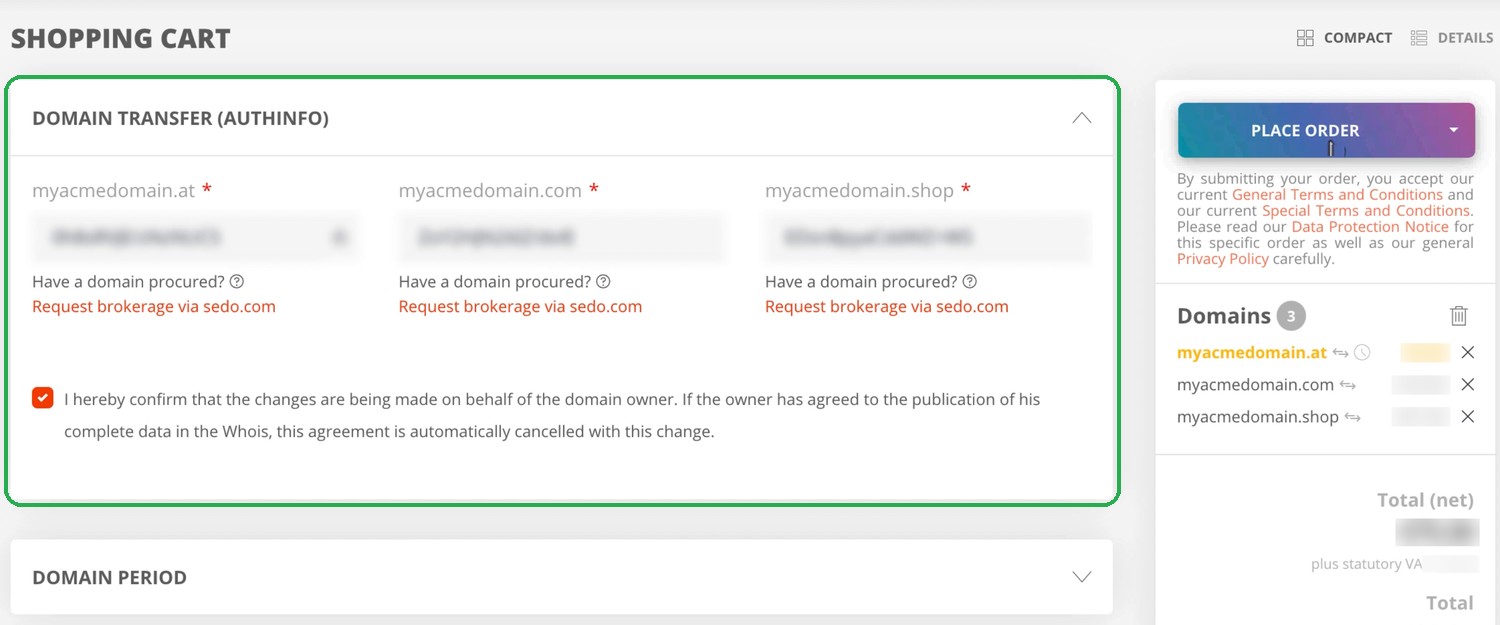
- On the shopping cart page, enter the AuthInfo in the Domain Transfer (AuthInfo) section and confirm that the transfer is carried out on behalf of the domain owner.
- Enter domain contacts and name servers and start the transfer with Place order.
A transfer can also be started in the Domain Studio: domains that are already registered appear there with a yellow button and the transfer price. In Expert mode, it is also possible to specify for each domain whether it is to be registered or transferred.
Transferring multiple domains (bulk)
- Open the Domain Multi Tool in the DOMAINS menu.
- Enter the domains line by line, optionally with AuthInfo and contact handles in the format domain.com,AuthInfo,Handle-ID. Alternatively, drop a text or CSV file via drag & drop. Then click Load all data.
- Select the domains, start the transfer via the More menu and click Add to shopping cart in the Transfer domains dialog.
- At checkout, add any missing AuthInfos and contacts and complete the order with Place order.
All steps in detail: Important domain actions – short guides.
Ensuring availability during the transfer: If InterNetX name servers are to be used after the transfer, create the DNS zone with all records in AutoDNS beforehand (see sections DNS zones and name servers). Otherwise, the website and email will be temporarily unavailable after the switch.
Managing domains in the portfolio
All domains are listed in the Portfolio under Domains. Domain data, name servers and DNSSEC can be edited there, and addons and domain services can be activated. Paid actions redirect directly to the shopping cart page.
Domains registered with another registrar can also be added. For more information, see External portfolio.
Checking the status of registrations and transfers
The status of an ongoing transfer can be viewed in the Portfolio on the Transfers tab.
- Registration: gTLDs such as .com are usually registered in real time, as are most European ccTLDs. Some ccTLDs are checked manually and take days to weeks. The processing time per extension is listed in the TLD Knowledge Base.
- Transfer: For gTLDs, the previous registrar has 5 days to reject the transfer; after that, it is confirmed automatically. For some ccTLDs, the transfer must be explicitly confirmed.
- Common causes of stuck transfers: incorrect or expired AuthInfo, an active transfer lock at the previous provider, a lock period after a registration or a change of owner, an unreachable email address of the domain owner.
Maintaining owner and contact data
Domain contacts are managed in AutoDNS as separate records and can be assigned to multiple domains. The domain owner’s data must be up to date, correct and complete; otherwise the domain may be deactivated.
Changing contact data
- In the DOMAINS menu, open Contact management under Domain contacts and click the desired contact.
- Change the data in the contact form and save it. The Address quality column shows whether the address data has passed the check.
Contact update or change of owner: Changes to the phone number or address count as a simple update. If the owner’s name, organization or email address changes for gTLDs, this counts as a change of owner (Change of Registrant). The old and the new owner must confirm it, and it can trigger a transfer lock.
Email verification of the domain owner
After a registration, a transfer or a change of the owner’s email address, the domain owner receives a verification email. Verification is mandatory and free of charge for all TLDs. If it is not completed in time (usually within 15 days), the domain is deactivated and is no longer reachable.
- Show pending verifications: DOMAINS → Portfolio → Domain tab → OwnerC verification filter.
- Resend the verification email: DOMAINS → Domain contacts → OwnerC verification filter → More menu → Resend verification mail. The entry only appears if the verification has failed.
For .de and .at domains, additional rules apply since NIS-2: strict validation of address data (no PO box addresses) and identity checks by DENIC or nic.at. All details: NIS-2 – Changes for domain holders.
Renewing, restoring and cancelling domains
Whether domains are renewed automatically depends on the payment model. A notification is sent before a domain expires; the Portfolio shows the renewal status of all domains under Renews/Restores.
Renewing domains
- Postpayment: Domains are renewed automatically (AutoRenew).
- Prepayment: Domains are deleted at the end of the term unless they are renewed manually beforehand (AutoDelete).
If a domain is not to be renewed, select the cancellation type DELETE with the execution At expiry in the Cancel domain dialog (see section Cancelling domains).
Caution with .de domains in AutoDelete mode: Instead of being deleted, they are returned to DENIC (TRANSIT). These domains cannot be restored; the owner receives mail from DENIC. Details: QuickGuide AutoDelete.
Cancelling domains
A cancellation is initiated in the domain list in the Portfolio:
- Open the More menu (“…”) of the domain and click Cancel. Alternatively, select the domain in the list and initiate the cancellation via the More menu of the selection. The Cancel domain dialog opens.
- Under Cancellation type, select DELETE (delete domain) or PREACK (release for transfer). For some ccTLDs such as .de, TRANSIT (return to the registry) is also available.
- Under Execution, select the time: Immediately, At expiry or On a specified date.
- Confirm with Create cancellation.
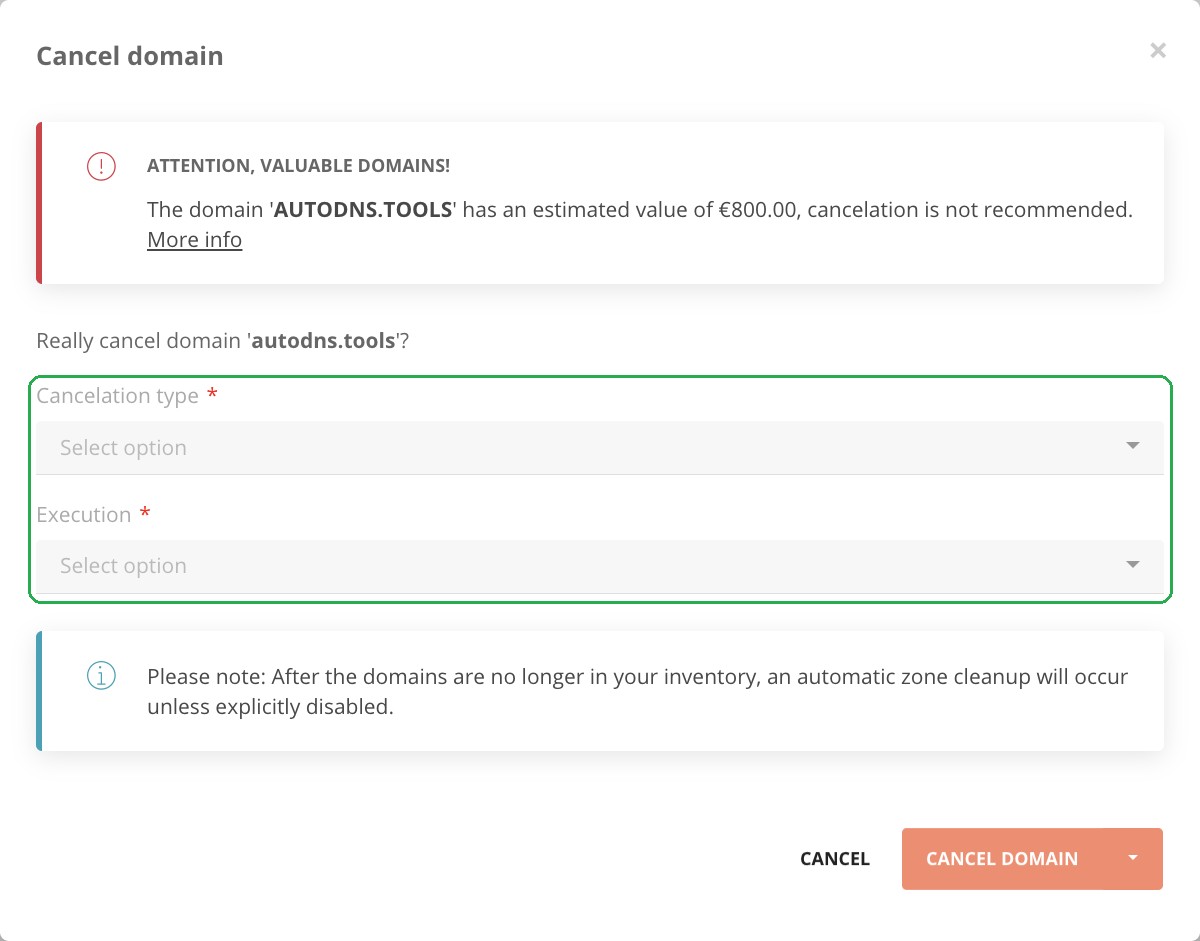
For domains with a high estimated value, the dialog displays a warning before the cancellation. As long as a cancellation has not yet been executed, it can be withdrawn. 60 days after the domain has left the inventory, its zone is deleted automatically, unless the zone purge has been disabled for the zone.
The current cancellation status of all domains is shown by the Cancellation status filter: DOMAINS → Portfolio → Filter in the left column.
| Cancellation status | Meaning |
|---|---|
| DELETE | Domain is cancelled: the domain is deleted, e.g. at the end of the term. |
| NONE | No cancellation: the domain continues to run. |
| PREACK | Released for transfer: the transfer to another provider is pre-approved (see next section). |
| TRANSIT | Return to the registry: the domain is returned to the registry, for .de to DENIC. |
Restoring deleted domains (restore)
Expired and deleted domains can be restored for a limited time for many TLDs. Restorable domains are listed under DOMAINS → Portfolio → Renews/Restores → Restores tab.
- During the ARGP (Auto Renew Grace Period), restoring is free of charge.
- During the RGP (Redemption Grace Period), it is subject to a charge; the prices according to the price list apply.
The deadlines that apply to an extension are listed in the TLD Knowledge Base.
Transferring a domain to another provider
For the transfer to another provider, the new provider needs the domain’s AuthInfo. With the cancellation status PREACK, the transfer can also be released in advance so that it does not have to wait for confirmation.
- Check whether transfer locks such as a registry lock are active and remove them.
- Generate the AuthInfo: in the Portfolio, open the More menu (“…”) of the domain and select AuthInfo. Pass the AuthInfo on to the new provider; it is only valid for a limited time, e.g. 30 days for .de.
- Optionally release the transfer in advance: select the cancellation type PREACK in the Cancel domain dialog (see section Cancelling domains).
- Start the transfer at the new provider.
DNS when moving away: DNS zones are not transferred. Create the records at the new provider beforehand. The zone in AutoDNS is deleted automatically 60 days after the transfer, see Automatic zone purge.
Creating and editing DNS zones
A DNS zone contains the resource records of a domain, e.g. for website and email. For new registrations and transfers, the zone can be created automatically; in all other cases, it is created manually.
Creating a zone
- In the Portfolio, click the “+” under DNS zones to create a new zone. The New DNS zone form opens.
- Enter general zone data, name server and SOA settings and create resource records. Under General, further domains can be added to the same zone via the “+” in the domain name field.
- Further records can be created via the More menu, e.g. email records, subdomains and resource records.
Existing zones of another provider can be imported via Zone import in the More menu. To do this, specify the domain and optionally the previous name server; AutoDNS imports the records via zone transfer (AXFR) or DNS query. No file upload is required.
Editing a zone
- In the Portfolio, click the zone under DNS zones. A form for editing opens.
- For a bulk job, select several zones and choose Edit selection in the More menu. When changing resource records, the affected zones are displayed.
Common resource records
| Type | Purpose | Example (name → value) |
|---|---|---|
| A / AAAA | Points a host name to an IPv4 or IPv6 address | www → 203.0.113.10 |
| CNAME | Alias to another host name | shop → shops.example.net |
| ALIAS | Like CNAME, but can also be used for the domain itself, see ALIAS record compared to CNAME record | example.com → app.example.net |
| MX | Mail server of the domain with priority | example.com → 10 mail.example.com |
| TXT | Text information, e.g. SPF, DMARC or verifications | example.com → v=spf1 mx -all |
| CAA | Specifies which certificate authorities may issue certificates for the domain | example.com → 0 issue “digicert.com” |
AutoDNS also supports HINFO, NAPTR, NS, PTR and SRV.
Note the automatic zone purge: Zones of domains that are not (or no longer) in the InterNetX inventory are deleted automatically after 60 days. This also applies to zones whose domain remains with another registrar. If such a zone is to be kept permanently, set the zone purge status of the zone to DISABLED. Details and restoration: Automatic zone purge.
Changing name servers
The name servers of a domain determine where its DNS zone is queried. The records of the zone in AutoDNS only take effect if a domain points to InterNetX name servers.
A change is only necessary if a domain with existing DNS at another provider is transferred, custom name server host names are to be used, or the zone is managed outside AutoDNS.
| Variant | Description |
|---|---|
| Standard name servers from InterNetX | Four redundant name servers with neutral host names: a.ns14.net, b.ns14.net, c.ns14.net, d.ns14.net. Required for the ACME interface (see section Automating certificates with ACME). |
| Virtual name servers (VNS) | Custom host names such as ns1.example.com that point to the InterNetX infrastructure. Suitable for a consistent appearance towards one’s own customers. |
| NodeSecure | Anycast DNS with name server locations distributed worldwide, including DNSSEC signing of the zones. |
| External name servers | The zone is managed outside AutoDNS. Records in AutoDNS then have no effect. |
Changing the name servers of a domain
- In the Portfolio, click the domain under Domains.
- Switch to the Name servers tab and enter the desired name server host names.
- Click Save to apply the change.
Before switching to InterNetX name servers, create the zone with all required records (see section DNS zones). Depending on the TLD and TTL, it can take a few hours for a changed delegation to take effect everywhere.
Setting up virtual name servers
- In the SERVICES menu → Products & Services, select the APIs & Services tab.
- Select the product Virtual name server, Standard or Virtual name server, NodeSecure and order it via Buy. Ordering the NodeSecure variant requires NodeSecure to be activated.
- Enter the host names of the new name servers and assign them to a name server group.
If the domain and zone are with InterNetX, the required A and AAAA records are entered automatically. All values for manual setup are listed under Virtual name servers (VNS).
Setting up redirects (Redirector)
The Redirector forwards domains to any target address and emails to another email address, without a dedicated web server or mail server. For domains in the InterNetX inventory, it can be booked as an optional service; for external domains on request.
- Under SERVICES → Products & Services, open the Redirector product card on the Products tab and order the Redirector.
- Complete the order in the shopping cart.
- In the Portfolio, switch to the Redirects tab and create the redirect with source and target. Existing redirects are listed there.
Prerequisite: the domain uses InterNetX name servers (see section Name servers). For email redirects, the SPF record of the source domain must contain the entry include:spf-redirector.domain-robot.org so that redirected emails are accepted.
Ordering TLS/SSL certificates and other encryption products
AutoDNS can be used to order and manage TLS/SSL, S/MIME, code signing, document signing and VMC certificates from certificate authorities such as DigiCert, GeoTrust, GlobalSign, Sectigo, Thawte and RapidSSL. Certificates are located in the SECURITY → Certificates area.
Choosing the right certificate
| Validation | What is checked | Typical use |
|---|---|---|
| DV (Domain Validation) | Control over the domain | Websites, automated issuance via ACME |
| OV (Organization Validation) | Domain and company, e.g. commercial register entry and phone number | Company websites, shops |
| EV (Extended Validation) | Domain and company with extended checks | Websites with high trust requirements |
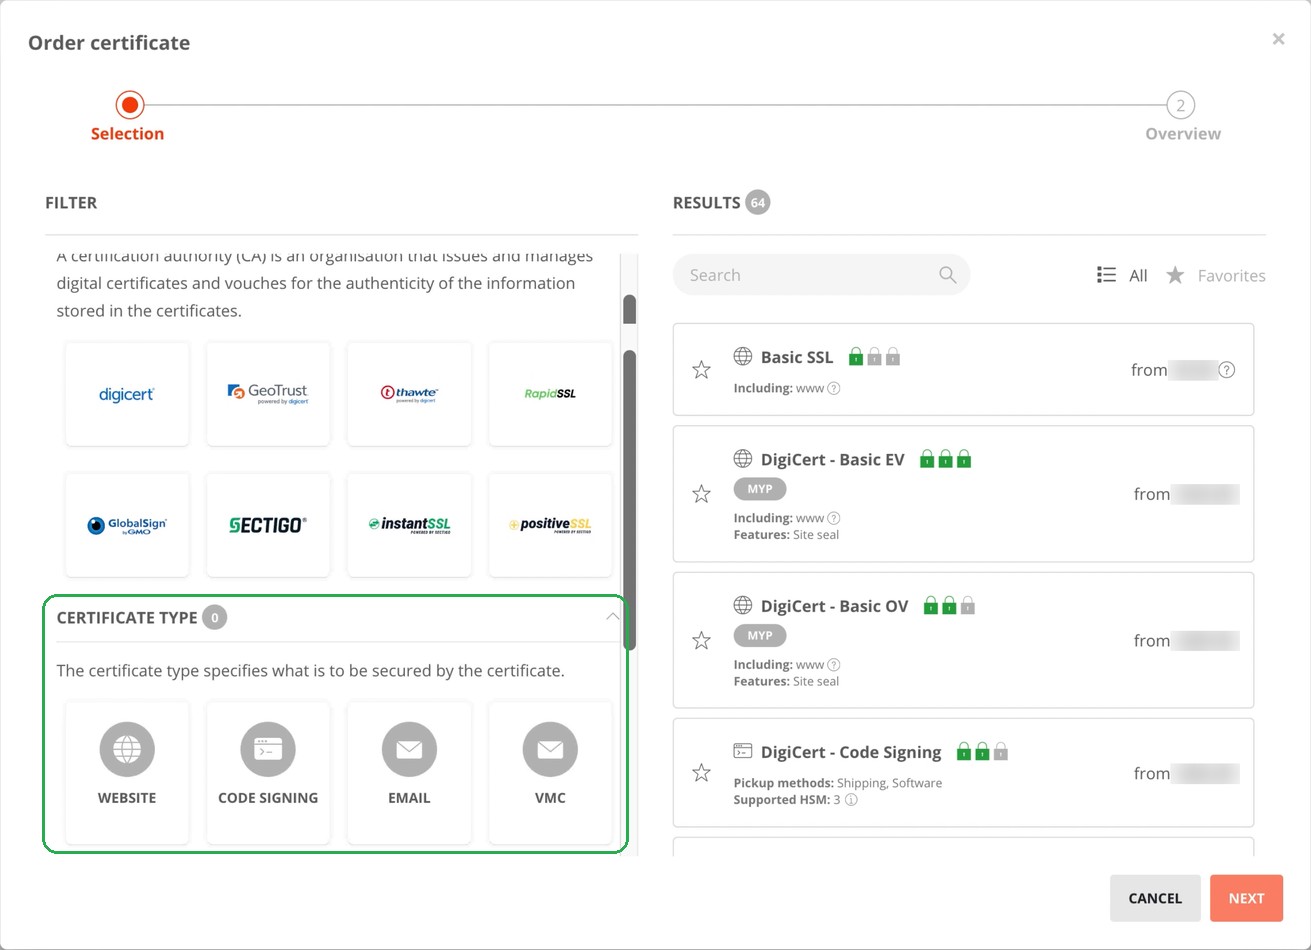
There are two ways to choose: in the order dialog, products can be filtered by certificate authority, certificate type (website, code signing, email, VMC, document signing), validation type (DV, OV, EV), SANs and other properties such as wildcard or malware scan. Hovering over a criterion displays an explanation; the results update in real time, and a search field finds specific products.
Alternatively, the certificate wizard guides step by step to the right product with a few questions, such as “What do you want to secure?”. Validation types, terms and requirements of the individual products are listed in the Knowledge base certificates.
Ordering a certificate
The steps in the order dialog adapt to the selected product; not every certificate goes through all steps.
- Preparation: For DV certificates, make sure that a confirmation email address (hostmaster, postmaster, webmaster, admin or administrator) can receive emails. For OV and EV, enter the company name exactly as in the commercial register. All points: What to do before ordering certificates?
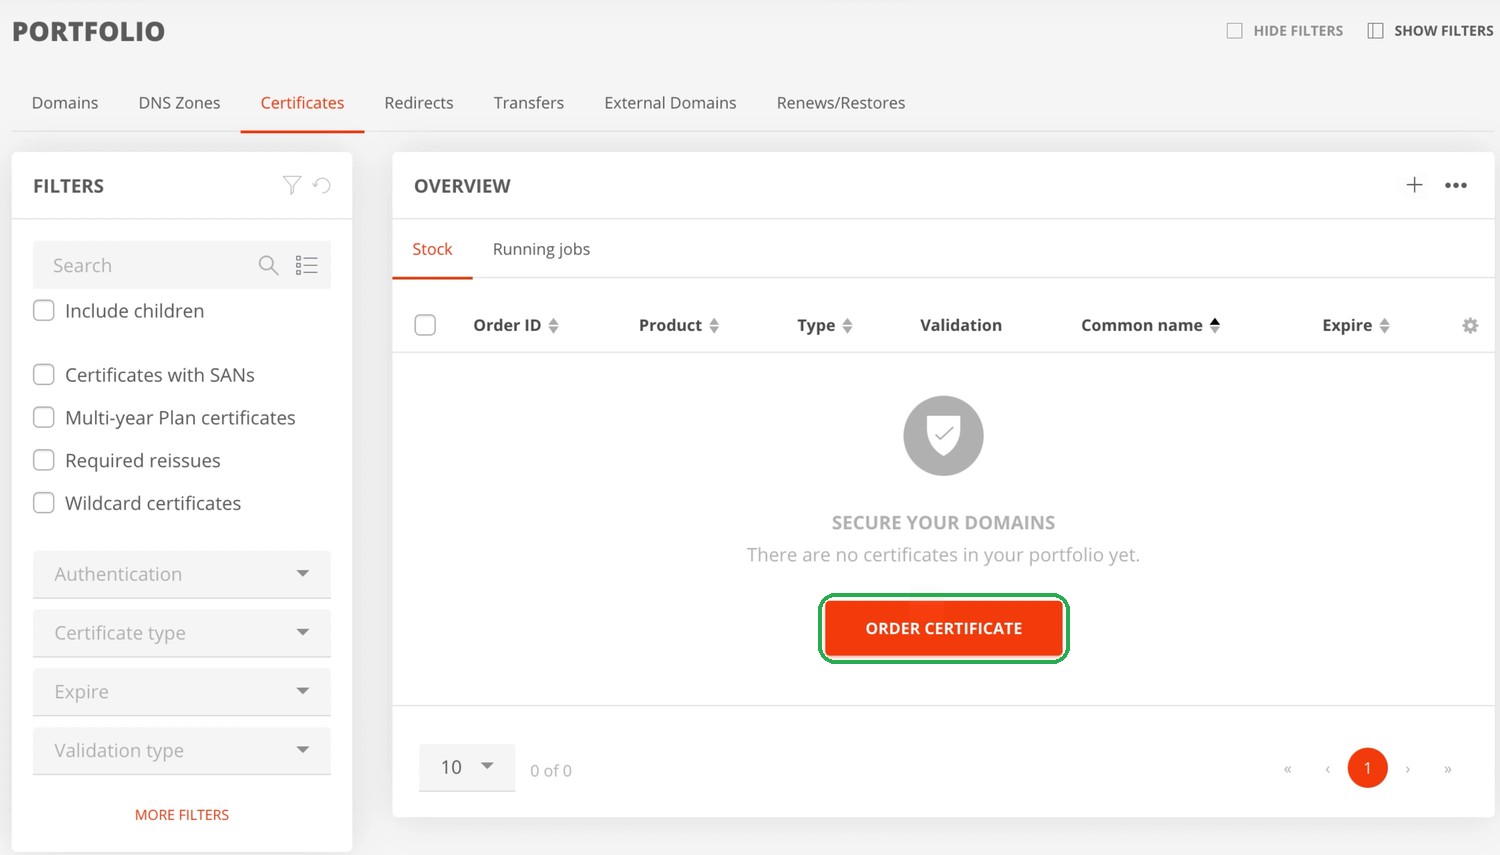
- Selection: Under SECURITY → Certificates, click the “+” or Order certificate, select the desired certificate and confirm with Next.
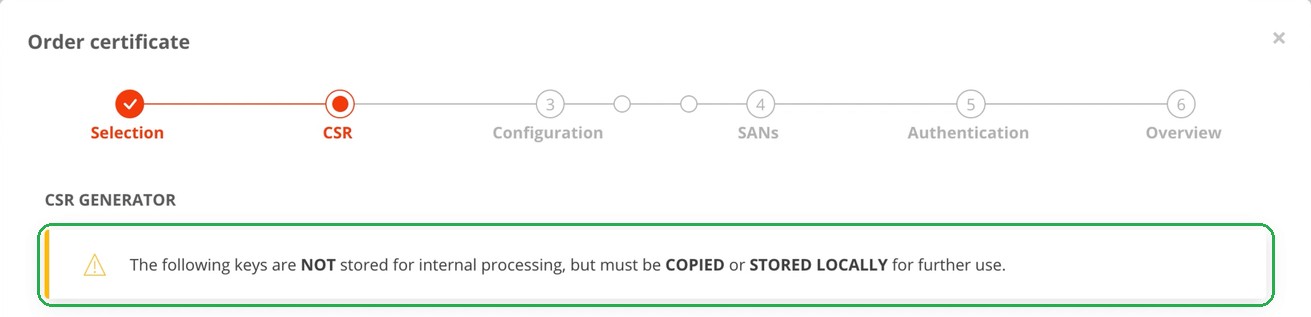
- CSR: Paste an existing CSR or drop it as a text file. Alternatively, use the CSR generator: specify the key, hash algorithm and contact details and click Generate CSR. Important: the CSR and private key are not stored and must be copied or saved locally immediately. Background: CSR - Certificate Signing Request.
- Configuration: Specify the administrative and the technical contact as validation and support contact; new contacts can be created via the More menu. Depending on the product, also select the contract term and server software and optionally enter an invoice comment.
- SANs: For certificates with SAN support, enter additional domain names and confirm each with Enter.
- Authentication: Select the method used to prove control over the domain: email, DNS or file. For email, select the approver email address. If the zone is in AutoDNS, the DNS record can be created directly in the zone.
- Overview: Check all details, add the certificate to the shopping cart, click Checkout there and complete the order with Place order.
Pending orders are listed in the certificate overview on the Running jobs tab. After issuance, install the certificate on the server: Tracking certificate orders.
For the renewal process, see Certificate renew.
Automating certificates with ACME
The maximum validity of TLS/SSL certificates is gradually decreasing to 47 days by 2029. Via the InterNetX ACME interface, DV certificates are issued and renewed automatically.
- Available products: BasicSSL, RapidSSL, RapidSSL Wildcard, SSL123 and SSL123 Wildcard.
- Prerequisite: the DNS zones of the domains are managed in AutoDNS on the ns14.net infrastructure. Validation is carried out exclusively via DNS-01.
- Create an ACME account binding in AutoDNS via the ACME bindings tab and save the access credentials immediately. For security reasons, they cannot be retrieved later.
- Store the access credentials in a common ACME client such as Certbot, acme.sh or win-acme.
Configuration and example commands: The ACME protocol - automated SSL certificate management.
Other encryption products
- S/MIME certificates sign and encrypt emails: S/MIME certificates - the fundamentals.
- Code signing, document signing and VMC (Verified Mark Certificates): Other certificates.
- Certificates from the SSL Manager can be transferred to AutoDNS together with their TLS/SSL contacts: Importing certificates from SSL Manager to AutoDNS.
Frequently asked questions when getting started
| Question | Answer |
|---|---|
| Why are no orders possible despite activation? | After activation, every account is reviewed (account review, usually up to 48 hours). With postpayment, orders are only possible once a limit has been set afterwards; with prepayment, credit can only be topped up after the review. With the credit card payment method, the credit card details must also be stored. |
| Why is a domain unreachable after a transfer or a name server change? | Usually the zone or a record in it is missing. Check whether the domain points to the desired name servers and whether the zone contains all records (see sections DNS zones and name servers). |
| Why has a zone disappeared? | Zones without an associated domain in the InterNetX inventory are deleted automatically after 60 days. Deleted zones can be restored: Automatic zone purge. |
| Why was a domain not renewed? | With prepayment, domains are not renewed automatically. The Portfolio shows the status under Renews/Restores. |
| Why does the certificate authority’s confirmation email not arrive? | The selected address must exist, an MX record must be set up, and greylisting must not be active for the address. Alternatively, choose validation via DNS. |
| Why is a domain suddenly unreachable? | The most common cause is an incomplete email verification of the domain owner. Pending verifications are shown by the OwnerC verification filter in the portfolio (see section Email verification of the domain owner). |
Further help
- Context-sensitive help is available for every form in AutoDNS via the ? icon.
- Important domain actions – short guides: registration, transfer, zones and services at a glance.
- FAQ AutoDNS Domain Platform: account, payment methods and renewal.
- TLD Knowledge Base: rules and deadlines for all extensions.
- Status page: current disruptions and maintenance work.
Was this article helpful?
Thanks for the feedback.